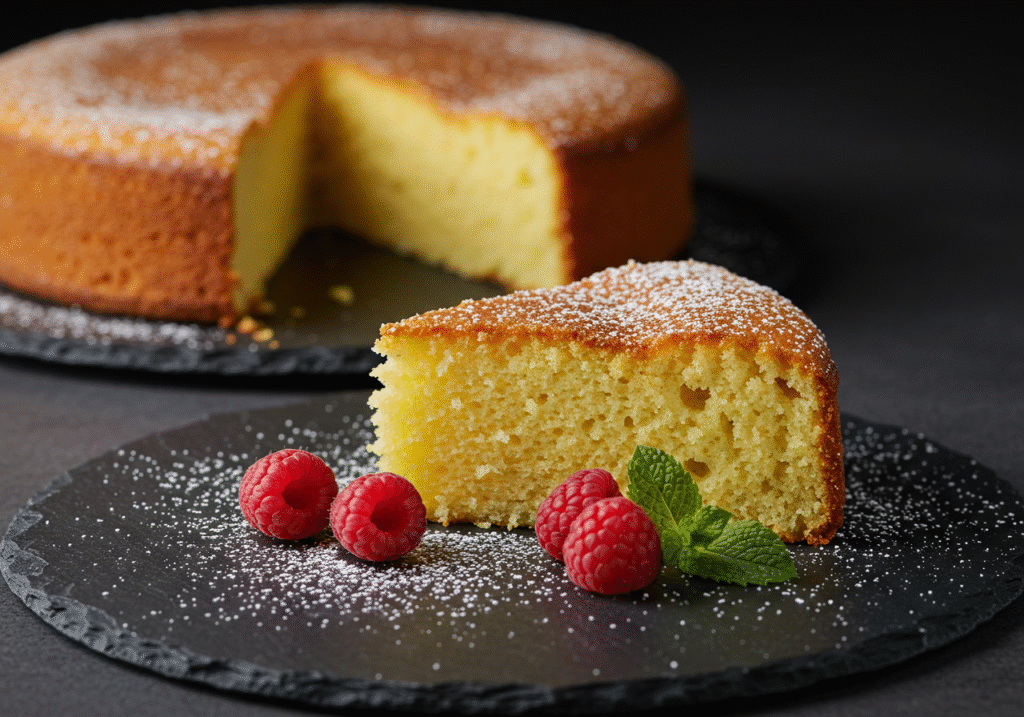
What separates a good butter cake from a legendary one? While most bakers focus solely on ingredients, professional patissiers know the true magic lies in a specific sequence of actions. If you’ve ever wondered why professional bakery cakes have that irreplaceably light texture while homemade versions often fall flat, you’re about to discover the guarded secrets. This guide moves beyond basic instructions, offering a masterclass in technique for an unparalleled butter cake recipe. We’re delving into the culinary science of emulsion, the precise physics of heat, and the seven non-negotiable steps that separate the amateurs from the artisans. Prepare to craft a butter cake that doesn’t just taste good—it performs.
Table of Contents
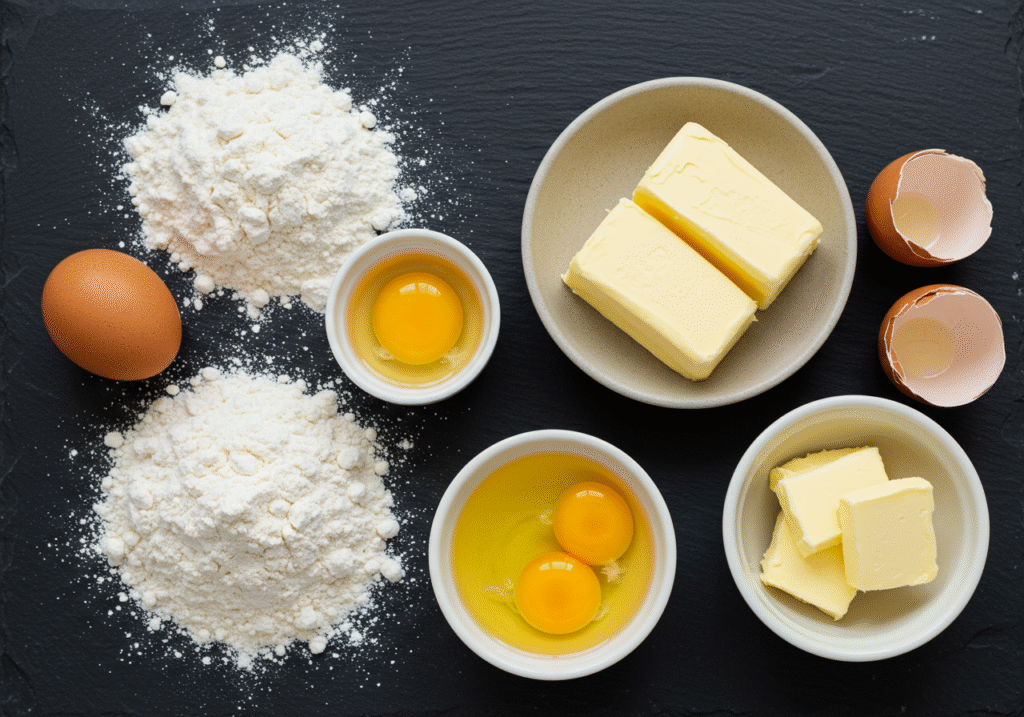
The Foundation: Your Ingredient Arsenal
Quality is paramount, but temperature is king. Every component must be at a precise ~65°F (18°C) to achieve the desired chemical reactions. For this master butter cake recipe, you will need:
- 2 cups (250g) Pastry Flour: The lower protein content compared to all-purpose flour is the first secret to a tender crumb. If unavailable, use 1 ¾ cups all-purpose flour and ¼ cup cornstarch, whisked together.
- 1 cup (227g) European-Style Cultured Butter, at room temperature: The higher butterfat content (82-86%) and cultured tang provide a deeper, more complex flavor profile than standard butter.
- 1 ⅔ cups (330g) Superfine Sugar: Its finer crystals dissolve more efficiently during creaming, creating a smoother, more stable aerated mixture.
- 4 Large Eggs, at room temperature: Separate the yolks and whites. We will use the whole egg, but adding them separately is crucial.
- 1 ½ teaspoons Vanilla Bean Paste: Offers a more potent and authentic flavor than extract, with visible specks for a professional touch.
- ⅔ cup (160ml) Full-Fat Buttermilk, at room temperature: The acidity tenderizes gluten strands and reacts with the baking powder for a superior rise.
- 2 ¼ teaspoons Baking Powder: Ensure it’s fresh for maximum leavening power.
- ¾ teaspoon Fine Sea Salt: Balances the sweetness and enhances the butter’s richness.
The Timeline: A Baker’s Schedule
Efficiency is born from organization. This butter cake recipe respects your time without cutting corners.
- Active Preparation: 25 minutes (This includes the meticulous mise en place, which actually reduces total hands-on time).
- Baking Duration: 45-55 minutes. The lower sugar content and buttermilk allow for a slightly lower baking temperature, promoting an even rise without doming.
- Mandatory Resting: 2 hours minimum. This allows the starches to fully set, ensuring a clean cut and perfect crumb structure.
- Total Project Time: 3 hours and 20 minutes.
The Master Process: Step-by-Step Instructions
Phase 1: The Foaming Method
Preheat your oven to 325°F (163°C). Grease a 9-inch round pan, line the bottom with parchment, and then grease the parchment. This double protection is foolproof.
Phase 2: The Sift
Sift the pastry flour, baking powder, and salt together not once, but twice. This isn’t old-fashioned; it’s critical for unparalleled lightness and a homogenous mixture.
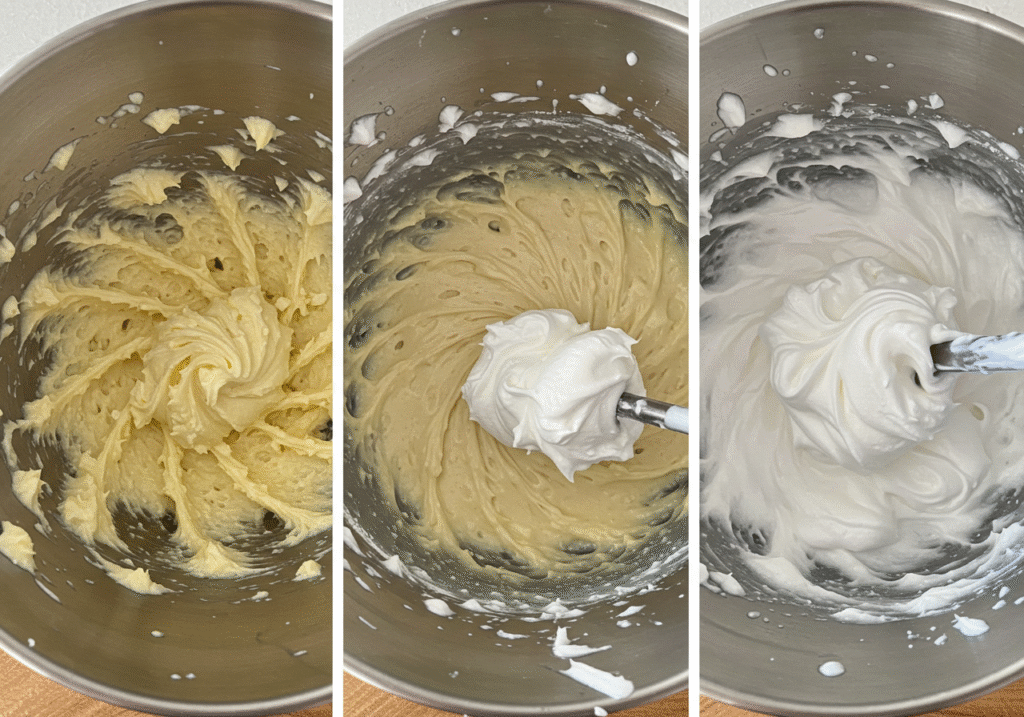
Phase 3: The Creaming Crucible
In a stand mixer with the paddle attachment, cream the softened butter and superfine sugar on medium speed for 2 minutes. Scrape down the bowl. Increase to medium-high and cream for a full 5 minutes more. The mixture must reach the “ribbon stage”—where it falls from the beater in thick, pale ribbons that hold their shape on the surface for a few seconds.
Phase 4: The Emulsion
With the mixer on medium, add the egg yolks one at a time, allowing each to fully incorporate before adding the next. This builds a stable water-in-fat emulsion. Add the vanilla bean paste. Transfer this mixture to a large bowl.
Phase 5: The Foam
Thoroughly clean and dry the mixer bowl. Using the whisk attachment, whip the 4 egg whites to soft peaks. This incorporated air is your second, hidden leavening agent.
Phase 6: The Final Fold
Alternate adding the sifted dry ingredients and the buttermilk to the butter mixture in three parts, folding gently with a spatula. Do not mix. Before the last streaks of flour are gone, fold in one-third of the whipped egg whites to loosen the batter. Then, gently fold in the remaining whites until just combined. This technique preserves every precious air bubble.
Phase 7: The Bake and The Wait
Pour the batter into the prepared pan and bake immediately. Bake for 45-55 minutes, until the cake is golden and a toothpick comes out with moist crumbs. Cool in the pan for 15 minutes, then invert onto a wire rack, remove the parchment, and flip right-side-up to cool completely. Do not slice for at least 2 hours.
Nutritional Insight (Per 1/12 Slice)
- Calories: 310
- Fat: 17g (Saturated: 11g)
- Cholesterol: 85mg
- Sodium: 220mg
- Carbohydrates: 36g (Fiber: 0.5g, Sugars: 20g)
- Protein: 4.5g
- Note: The use of superfine sugar and buttermilk slightly alters the nutritional profile from a standard recipe.
Creative Adaptations
- Brown Butter Twist: Brown the butter before creaming it with the sugar for a deep, nutty dimension.
- Citrus Zest Infusion: Add the zest of one lemon or orange during the creaming phase for a bright, aromatic lift.
- Spiced Variation: Infuse the buttermilk with a cinnamon stick or cardamom pods over low heat, then let it cool to room temperature before using.
Serving & Presentation
This cake stands proudly on its own but can be elevated.
- Seasonal Compote: Top with a quick compote of seasonal fruit (e.g., rhubarb in spring, spiced pear in autumn).
- Textural Contrast: Serve with a dollop of crème fraîche and a sprinkle of toasted, chopped nuts for crunch.
- Elegant Glaze: A simple glaze made with citrus juice and powdered sugar drizzled over the top adds sweetness and shine.
The Pitfall Checklist: Why Cakes Fail
- Rushing the Creaming: Underaerated butter/sugar is the root cause of density.
- Overmixing Post-Flour: This develops gluten, leading to a tough, rubbery texture.
- Ignoring Oven Hot Spots: If your oven runs hot, rotate the pan halfway through baking to ensure an even rise.
- The Warm Slice: Cutting into a warm cake steams the interior and destroys the crumb. Patience is non-negotiable.
Preservation Methods
- Room Temperature: Keeps for 2 days under a cake dome.
- Refrigeration: Will dry out the crumb. Not recommended.
- Freezing: This cake freezes exquisitely. Wrap the fully cooled cake in two layers of plastic wrap and one of foil. Freeze for up to 3 months. Thaw, still wrapped, on the counter for 4 hours.
Conclusion
This butter cake recipe is a lesson in precision and patience. By mastering the foaming method, the emulsion, and the fold, you have not just followed a recipe—you have learned a fundamental baking technique. This cake is your new benchmark, a testament to the fact that technique trumps all. Share it with someone who appreciates the art of baking, and watch their reaction become your greatest reward. don’t forget to check out our best cake recipes
FAQs
Q1: Why use pastry flour instead of all-purpose?
Pastry flour has a protein content between cake and all-purpose flour (~9%). This is the sweet spot for a butter cake: sturdy enough to hold the butter yet low enough to remain exceptionally tender.
Q2: My butter/sugar never reached the “ribbon stage.” What happened?
Your butter was likely too cold or too warm. It should be cool to the touch but leave a deep indentation when pressed. If it’s oily or melting, it cannot hold air.
Q3: Why whip the egg whites separately? Isn’t that for angel food cake?
This is the signature technique for this recipe. It incorporates a massive amount of additional air without developing gluten, resulting in an open, cloud-like crumb that is impossible to achieve through creaming alone.
Q4: Can I use this recipe for cupcakes?
Absolutely. Fill lined cupcake tins ⅔ full and bake at 350°F (175°C) for 18-22 minutes. The baking time is shorter due to the smaller volume.
Q5: The top of my cake is very pale. Is it done?
Ovens vary. Trust the toothpick test and internal temperature (205°F / 96°C) over color. If you desire more color, you can brush the top with milk before baking or move the rack to the upper third of the oven for the last 5 minutes.