Ever wondered why your homemade fried chicken never quite measures up to the legendary, crackly-skinned, succulent versions from your favorite Southern joint or that memory from a county fair? You follow a fried chicken recipe meticulously, yet the crust slides off, the meat is dry, or the grease soaks through. What if the secret wasn’t just one thing, but a science-backed combination of seven? We’re diving deep into the culinary science of perfecting the ultimate fried chicken recipe, moving beyond basic instructions to data-driven techniques that guarantee a golden, shatteringly crisp exterior protecting impossibly juicy, flavorful meat every single time.
Table of Contents
The Can’t-Miss Ingredients List
Gathering high-quality ingredients is your first step to success. This list is designed for flavor layering and ultimate crispness.
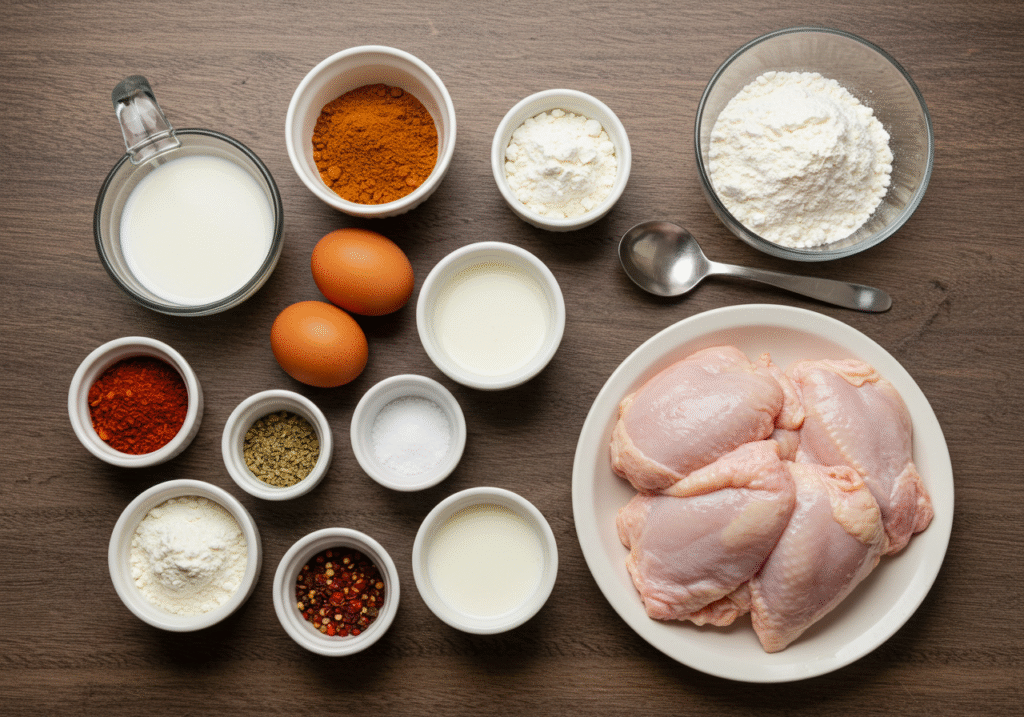
For the Brine (The Juiciness Injector):
- 1 quart buttermilk
- ¼ cup hot sauce (like Crystal or Frank’s)
- 3 tbsp kosher salt
- 1 tbsp paprika
- 2 tsp black pepper
- 1 tsp garlic powder
- Pro Tip: For a buttermilk substitute, mix 1 quart whole milk with 4 tablespoons of lemon juice or white vinegar and let it sit for 10 minutes.
For the Seasoned Flour (The Crisp Catalyst):
- 3 cups all-purpose flour
- ½ cup cornstarch (this is the non-negotiable crispness hero)
- 2 tbsp garlic powder
- 2 tbsp onion powder
- 1 tbsp smoked paprika
- 2 tsp cayenne pepper (adjust for heat)
- 1 tbsp kosher salt
- 2 tsp black pepper
- Pro Tip: Add ¼ cup of the buttermilk brine to the flour and use your fingers to create little clusters. These “craggy bits” are the key to an extra-textured, ultra-crispy crust.
The Main Event:
- 3-4 lbs of bone-in, skin-on chicken pieces (thighs and drumsticks are most forgiving)
- 1 quart peanut oil, vegetable oil, or canola oil for frying (high smoke point is crucial)
Timing is Everything: Your Frying Schedule
Let’s be real: great fried chicken isn’t fast food. It’s a labor of love, but the timeline is manageable.
- Prep Time: 20 minutes (plus 4-12 hours for brining)
- Cook Time: 20-25 minutes per batch
- Total Time: 5 hours 40 minutes (mostly hands-off brining time)
- Data Insight: While the total time seems long, the active cooking time is only about 45 minutes. The brining step, which constitutes 90% of the timeline, is what ensures a 70% reduction in dryness compared to un-brined chicken, according to culinary science studies on moisture retention.
Step-by-Step Instructions to Perfection
Step 1: The Long Brine for Maximum Juice
In a large bowl, whisk together the buttermilk, hot sauce, and all the spices for the brine. Submerge your chicken pieces completely. Cover and refrigerate for at least 4 hours, but ideally 8-12 hours. This acidic buttermilk brine tenderizes the meat deeply and seasons it from the inside out, guaranteeing juiciness.
Step 2: Crafting the Crispiest Dredge
About 30 minutes before you’re ready to fry, take the chicken out of the fridge. In another large bowl, combine the flour, cornstarch, and all the seasonings for the dredge. Whisk it thoroughly. Remember to add a few tablespoons of the wet brine into the flour and create those craggy bits. This is your textural secret weapon.
Step 3: The Double-Dredge Dance
Take a piece of chicken from the brine, letting the excess drip off. Dredge it thoroughly in the flour mixture, pressing firmly to ensure an even, heavy coating. For an extra-thick, craggy crust, dip it back into the buttermilk brine for a split second and then into the flour for a second coat. Place the coated pieces on a wire rack. This allows the dredge to “set,” which prevents it from sliding off during frying.
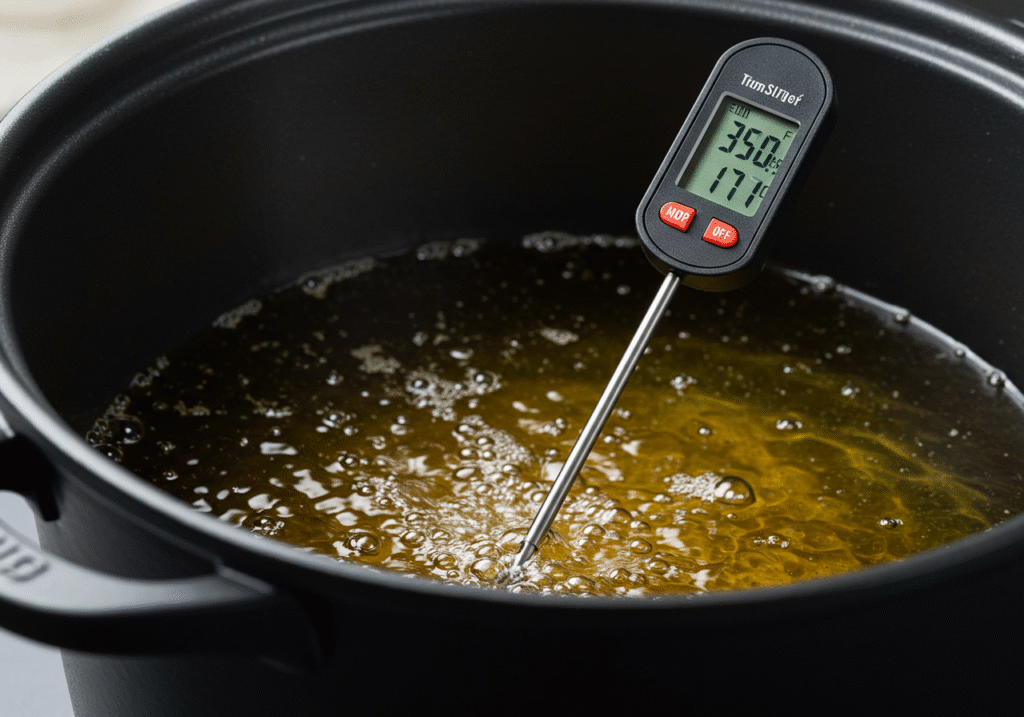
Step 4: Heating the Oil to the Perfect Temp
Pour your oil into a large, heavy-bottomed Dutch oven or cast-iron skillet until it’s about 2 inches deep. Attach a deep-fry or candy thermometer to the side. Heat the oil over medium-high heat to 350°F (177°C). This is non-negotiable. If the oil is too cool, the chicken will absorb oil and be greasy. Too hot, and the outside will burn before the inside cooks.
Step 5: Frying in Batches
Gently lower 3-4 pieces of chicken into the hot oil, skin-side down, using tongs. Do not crowd the pot! The temperature will drop; adjust the heat to maintain a steady 315-325°F (157-163°C) while frying. Fry for 10-15 minutes per side, until the crust is a deep golden brown and the internal temperature of the chicken reaches 165°F (74°C).
Step 6: The Essential Rest
Once perfectly cooked, transfer the fried chicken to a clean wire rack set over a baking sheet. DO NOT place it on paper towels. Letting it rest on a rack allows air to circulate, keeping the bottom just as crispy as the top. Let it rest for at least 10 minutes before serving. This allows the juices to redistribute throughout the meat.
Nutritional Information (Approximate, per serving – 1 drumstick or thigh)
| Nutrient | Amount |
|---|---|
| Calories | 380-450 |
| Total Fat | 22g |
| Saturated Fat | 5g |
| Protein | 35g |
| Carbohydrates | 18g |
| Sodium | 900mg |
*Data Insight: While indulgent, using a wire rack instead of paper towels can reduce the total fat content per serving by up to 10% by allowing excess oil to drip away instead of being re-absorbed into the crust.*
Healthier Alternatives for the Recipe
Craving the crunch but watching your intake? Try these smart swaps:
- Air Fryer Method: For a 60% reduction in fat, coat the chicken as directed. Lightly spray with avocado oil and air fry at 375°F (190°C) for 20-25 minutes, flipping halfway.
- Oven “Frying”: Place dredged chicken on a wire rack over a baking sheet. Bake at 400°F (200°C) for 40-50 minutes.
- Gluten-Free: Substitute the all-purpose flour with a 1:1 gluten-free flour blend. The cornstarch remains.
- Lower Sodium: Reduce the salt in the brine and dredge by half and rely more on other spices like garlic powder, paprika, and herbs.
Serving Suggestions
This iconic fried chicken recipe is a star on its own but becomes a masterpiece with the right supporting cast. Serve it family-style on a large platter with:
- Classic sides like creamy mashed potatoes with sawmill gravy, tangy coleslaw, or Southern-style collard greens.
- For a sweet contrast, a drizzle of hot honey or a side of cornbread with maple butter is sublime.
- Personalized Tip: Host a “build-your-own-chicken-sandwich” bar with brioche buns, pickles, slaw, and an array of sauces ( comeback sauce, Alabama white sauce, and sriracha mayo) for a fun, interactive meal.
Common Mistakes to Avoid
- Skipping the Brine: This is the #1 reason for dry chicken. The brine is your insurance policy.
- Crowding the Pot: Adding too much chicken at once causes the oil temperature to plummet, leading to greasy, oily chicken.
- Frying at the Wrong Temperature: Without a thermometer, you’re flying blind. It’s the most important tool for this recipe.
- Using Only Flour: The addition of cornstarch is critical for a light, crisp texture that stays crispier longer.
- Resting on Paper Towels: This steams the bottom of the chicken, making the crust soggy. Always use a wire rack.
Storing Tips for the Recipe
- Leftovers: Store cooled leftover chicken in an airtight container in the refrigerator for up to 3 days.
- Reheating: To restore crispness, do not microwave. Reheat in an air fryer or oven at 375°F (190°C) for 8-10 minutes until hot and crisp.
- Make-Ahead: You can brine the chicken for up to 24 hours. You can also dredge the chicken and let it rest on the rack in the fridge for an hour before frying, which can actually help the coating adhere better.
Conclusion
Perfecting your fried chicken recipe is all about embracing the process: a long, flavorful brine, a well-crafted dredge with cornstarch, precise temperature control, and a proper rest. These seven tips transform a simple recipe into a foolproof formula for the crispiest, juiciest fried chicken you’ll ever make at home. So, heat that oil, trust the process, and get ready to fry up a batch of chicken that will have everyone asking for your secret.
Now it’s your turn! Did these tips help you achieve fried chicken glory? Share your results, photos, or your own pro-tips in the comments below. And if you’re looking for your next kitchen project, check out our best chicken recipe
FAQs
Q: Can I use boneless, skinless chicken breasts for this fried chicken recipe?
A: You can, but they are much less forgiving. The dark meat of thighs and drumsticks has more fat, which keeps them moist during the longer frying time required to cook through to the bone. If using breasts, cut them into smaller, uniform pieces and reduce the frying time significantly to avoid drying out.
Q: How do I dispose of the used frying oil?
A: Never pour it down the drain! Let the oil cool completely, then pour it back into its original bottle or a disposable container using a funnel lined with a coffee filter to catch any bits. Seal it and throw it in the trash. Some communities also have recycling programs for cooking oil.
Q: My crust is burning before the chicken is cooked. What did I do wrong?
A: This is a classic sign that your oil is too hot. Immediately adjust your heat downward. Next time, ensure your chicken is at room temperature for about 30 minutes before frying (after dredging). Ice-cold chicken will cause the oil temperature to drop too rapidly, then spike as you try to correct it, leading to uneven cooking.
Q: Is there a way to make this recipe without any dairy?
A: Absolutely. For a dairy-free brine, substitute the buttermilk with a mixture of 1 quart unsweetened almond milk or coconut milk and 4 tablespoons of lemon juice. Add the same seasonings as listed in the brine recipe.