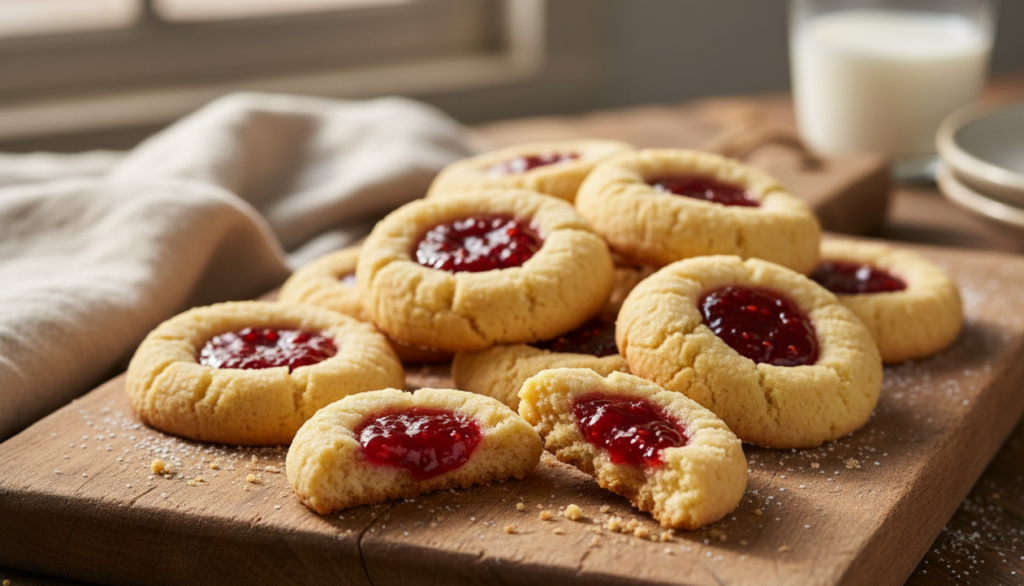
Introduction: A Cookie Jar Classic Reimagined
There’s something magical about that moment when your thumb sinks into a chilled ball of cookie dough, creating the perfect little well for a dollop of jewel-toned jam. The aroma of butter and vanilla wafts through your kitchen, promising a treat that’s both elegant and comforting. If you’re new to baking, let me tell you: buttery raspberry thumbprint cookies are your perfect starting point. They look impressive, require no fancy equipment, and deliver that “wow” factor that makes people think you’ve been baking for years.
I remember the first time I made these as a teenager, nervously watching the oven as the cookies spread just enough, the jam bubbling slightly at the edges. That first bite—the delicate, crumbly texture giving way to the sweet-tart burst of raspberry—was a revelation. Today, I’m sharing everything I’ve learned over countless batches so you can skip the trial and error and create perfect cookies on your first try. These aren’t just cookies; they’re edible happiness.
Why These Cookies Are a Beginner’s Best Friend
Before we dive into the recipe, let’s talk about why thumbprint cookies are the ideal project for novice bakers. First, they’re incredibly forgiving. Unlike finicky macarons or temperamental soufflés, these cookies want to work with you. The dough comes together easily, and the thumbprint technique is simple but looks impressively professional. Second, they teach fundamental baking skills: creaming butter and sugar, working with dough, and understanding oven timing. Finally, they’re endlessly adaptable. Once you master the basic dough, you can create dozens of variations.
The Science Behind the Perfect Texture
What makes these cookies so delightfully crumbly and tender? It’s all about the fat. Butter, when creamed with sugar, creates tiny air pockets that expand in the oven, giving the cookie its structure. The cornstarch in our recipe (a baker’s secret weapon) tenderizes the gluten in the flour, ensuring a melt-in-your-mouth texture rather than a tough one. This combination creates what professional bakers call a “short” dough—rich, tender, and perfectly suited to holding that raspberry jewel.
Your Foolproof Buttery Raspberry Thumbprint Cookie Recipe
Prep Time: 25 minutes (plus 1 hour chilling) | Cook Time: 12-14 minutes | Total Time: 1 hour 40 minutes | Yield: 24-28 cookies
Ingredients: Quality Matters
For the Cookie Dough:
- 1 cup (2 sticks) unsalted butter, at room temperature
- ⅔ cup granulated sugar
- 2 large egg yolks (save the whites for another use!)
- 2 teaspoons pure vanilla extract
- ¼ teaspoon almond extract (optional but recommended)
- 2¼ cups all-purpose flour, spooned and leveled
- ¼ cup cornstarch
- ½ teaspoon fine sea salt
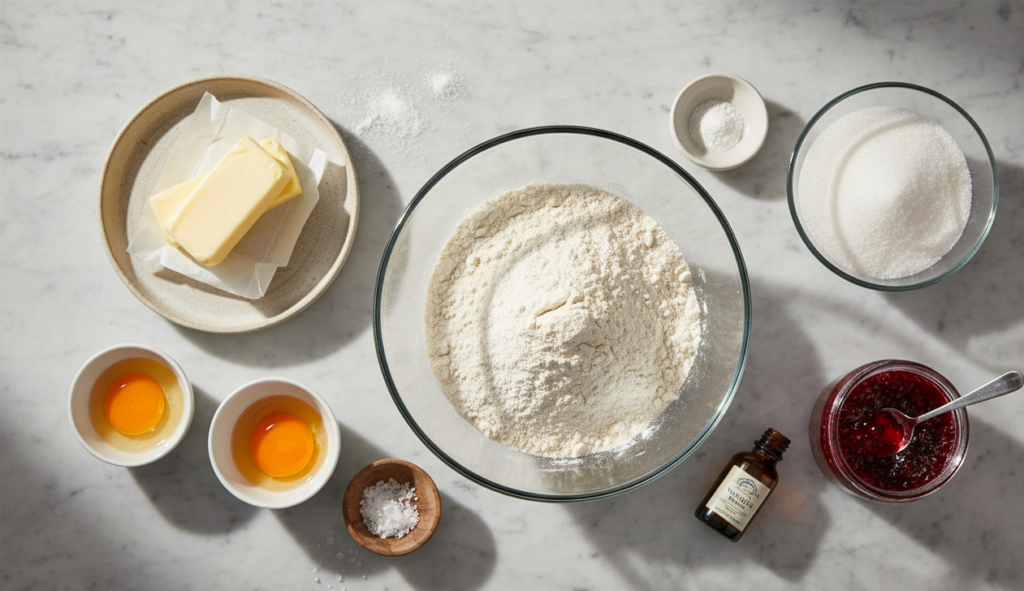
For the Filling & Finishing:
- ½ cup seedless raspberry jam (about 6 ounces)
- 1 tablespoon powdered sugar for dusting (optional)
Baker’s Note: I can’t emphasize enough—use real butter. Margarine or spreads contain more water and won’t give you that rich, crumbly texture that defines perfect thumbprint cookies. For the jam, I prefer seedless because it creates a smoother appearance, but regular raspberry jam works beautifully too.
Step-by-Step Instructions with Pro Tips
Step 1: Creaming to Perfection
In a large mixing bowl, beat the room-temperature butter and granulated sugar together on medium speed for 3-4 minutes. This isn’t just mixing—you’re incorporating air that gives the cookies lift. The mixture should become noticeably lighter in color and fluffy. Scrape down the sides of the bowl with a rubber spatula to ensure everything is incorporated.
Step 2: Building Flavor
Add the egg yolks, vanilla extract, and almond extract (if using) to the butter mixture. Beat on medium until fully combined, about 1 minute. The almond extract isn’t traditional, but it adds a wonderful depth that complements the raspberry beautifully.
Step 3: The Dry Ingredients
In a separate bowl, whisk together the flour, cornstarch, and salt. This ensures even distribution without overmixing later. Gradually add the dry ingredients to the wet ingredients on low speed, mixing just until the dough comes together and no dry spots remain. Overmixing develops gluten, which can make cookies tough.
Step 4: The Essential Chill
Divide the dough into two portions, flatten into discs, wrap tightly in plastic wrap, and refrigerate for at least 1 hour (up to 2 days). This step is non-negotiable! Chilling solidifies the butter, preventing the cookies from spreading too much in the oven. According to the King Arthur Baking Company, chilled dough also allows flavors to meld and hydrate the flour properly.
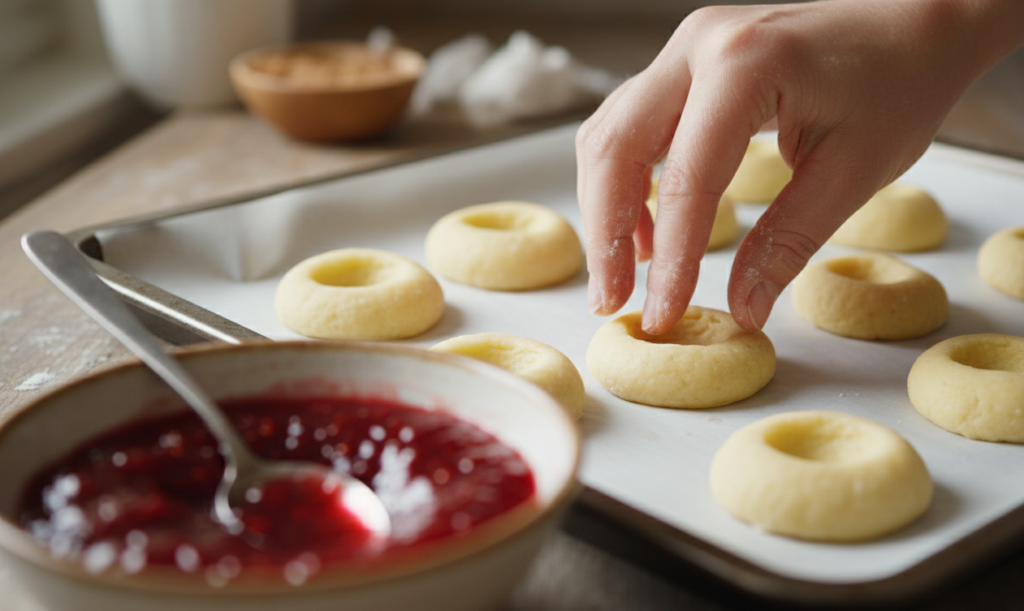
Step 5: Shaping and Thumbprinting
Preheat your oven to 350°F (175°C) and line baking sheets with parchment paper. Roll the dough into 1-inch balls (about 1 tablespoon each). Place them 2 inches apart on the sheets. Now for the fun part: using your thumb, the back of a measuring spoon, or even the handle of a wooden spoon, make an indentation in the center of each ball. Don’t press all the way through to the baking sheet—just about halfway.
Step 6: The Raspberry Jewel
Fill each indentation with about ½ teaspoon of raspberry jam. Don’t overfill, or it will bubble over and create a mess. For easier handling, you can warm the jam slightly in the microwave (10-15 seconds) to make it more pourable.
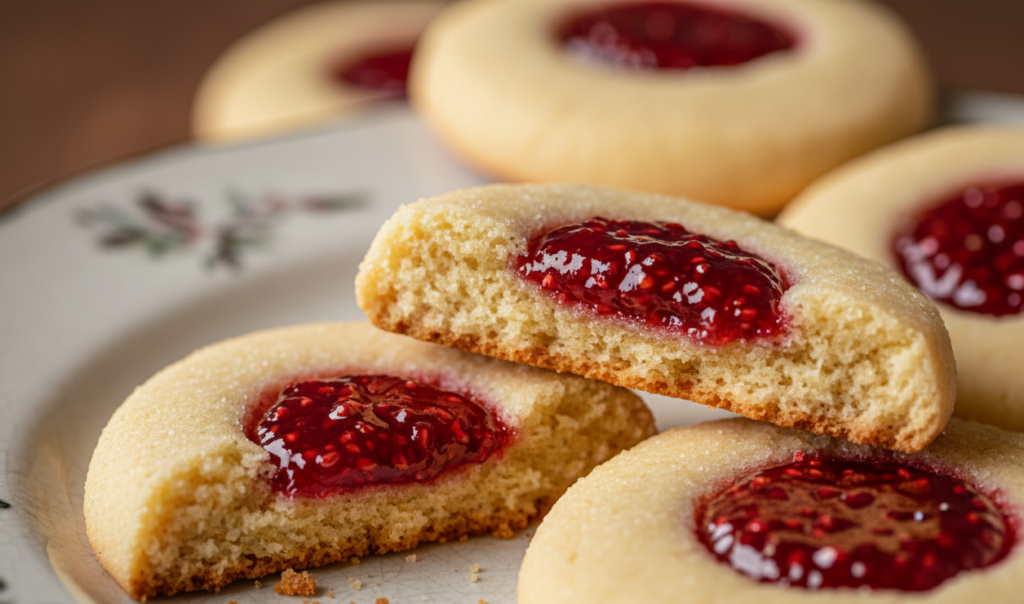
Step 7: Baking to Golden Perfection
Bake for 12-14 minutes, rotating the sheets halfway through, until the edges are just beginning to turn golden. The cookies will still look soft in the center—that’s perfect. They’ll firm up as they cool. Let them cool on the baking sheet for 5 minutes before transferring to a wire rack to cool completely.
5 Pro Tips for Cookie Excellence
- Temperature is Everything: Your butter should be cool room temperature—about 65°F. You should be able to make an indent with your finger, but the butter shouldn’t feel greasy or look shiny. Too warm, and your cookies will spread; too cold, and they won’t cream properly.
- The Thumbprint Secret: If your indentations puff up during baking, remove the cookies halfway through and gently redefine the wells with the back of a spoon. Some bakers even add a tiny bit of extra jam at this point.
- Jam Alternatives: While raspberry is classic, don’t be afraid to experiment. Apricot, blackberry, or even a mix of jams creates a beautiful variety. For a sophisticated twist, try a teaspoon of luxe homemade lemon curd instead.
- Storage Solutions: Store cooled cookies in an airtight container at room temperature for up to 5 days. Layer them with parchment paper to prevent sticking. They also freeze beautifully for up to 3 months.
- Troubleshooting: If your cookies spread too much, your butter was likely too warm or your dough wasn’t chilled enough. If they’re too dry, you may have measured your flour incorrectly (always spoon and level!). The USDA’s food safety guidelines recommend refrigerating dough with eggs if you’re not baking it within 2 hours.
Frequently Asked Questions
Q1: Can I use frozen butter instead of room temperature?
No, for this recipe, room temperature is crucial. Cold butter won’t cream properly with the sugar, resulting in dense cookies. If you’re short on time, cut the butter into small cubes—it will come to temperature faster.
Q2: My jam always bubbles over. How can I prevent this?
This usually means you’re overfilling the wells or your oven is too hot. Try using slightly less jam (about ¾ of what you think you need) and check your oven temperature with an oven thermometer. Also, avoid using preserves with large fruit chunks, which can create uneven heat distribution.
Q3: Can I make these cookies gluten-free?
Absolutely! Replace the all-purpose flour with a 1:1 gluten-free baking blend that contains xanthan gum. The texture might be slightly more delicate, so handle them gently when transferring.
Q4: Why do I need to chill the dough? Can I skip it?
I don’t recommend skipping the chill time. Chilling solidifies the fat, preventing excessive spreading. It also allows the flour to hydrate fully, giving you a more tender cookie. If you’re in a pinch, you can freeze the shaped cookies for 20 minutes instead of refrigerating the dough for an hour.
Q5: Can I use other extracts besides vanilla?
Certainly! Orange extract pairs beautifully with raspberry, or try ½ teaspoon of lemon extract for a brighter flavor. Just remember that pure extracts are more potent than imitation, so adjust quantities accordingly.
Q6: How do I get my cookies to look perfectly round?
After removing them from the oven, you can use a round cookie cutter slightly larger than the cookie to gently “scoot” any uneven edges into a perfect circle. Do this while they’re still warm and soft on the baking sheet.
Q7: Can I make the dough ahead of time?
Yes! The dough can be refrigerated for up to 3 days or frozen for up to 3 months. If freezing, wrap it tightly and thaw overnight in the refrigerator before shaping and baking.
Conclusion: Your Baking Journey Starts Here
And there you have it—everything you need to create stunning buttery raspberry thumbprint cookies that will impress friends, family, and most importantly, yourself. Remember, baking is part science, part art, and entirely about the joy of creating something with your own hands. These cookies, with their tender crumb and burst of raspberry sunshine, are more than just a treat—they’re a confidence-builder.
I’d love to hear about your baking adventure! Did you stick with classic raspberry or try a different jam? What variations did you experiment with? Share your experiences, photos, or questions in the comments below. And if you found this guide helpful, please pass it along to another aspiring baker in your life—because good recipes, like good cookies, are meant to be shared.
Hungry for more beginner-friendly baking? Explore our collection of simple cookie recipes perfect for your next gathering, or learn how to master the art of perfect pie crust in our next guide.